§ Essay
Vue3 + TypeScript 前端开发教程
教程
基于 Vue3 的 setup 语法糖讲解,全程采用 TypeScript + 组合式 API 编码,带你快速上手 Vue3。
一、Vue3
1、简介
Vue 是一套渐进式 JavaScript 框架,Vue3 是其第 3 个大版本
渐进式:可以只引入 Vue 做页面小交互,也可以用它构建完整大型单页应用(SPA),按需选用
- 2020 年 9 月 18 日,
Vue.js发布版3.0版本,代号:One Piece(海贼王) - 官方发版地址:Release v3.0.0 One Piece · vuejs/core
- 截止2023年10月,最新的公开版本为:
3.3.4
2、Vue3 亮点
-
性能的提升
-
打包大小减少
41% -
初次渲染快
55%, 更新渲染快133% -
内存减少
54%
-
-
源码的升级
-
使用
Proxy代替defineProperty实现响应式 -
重写虚拟
DOM的实现和Tree-Shaking
-
-
拥抱 TypeScript
Vue3可以更好的支持TypeScript
-
新的特性
- 组合式 API
- 新的内置组件
二、创建Vue3工程
1、基于 vue-cli 创建
点击查看官方文档
备注:目前
vue-cli已处于维护模式,官方推荐基于Vite创建项目
## 查看@vue/cli版本,确保@vue/cli版本在4.5.0以上
vue --version

## 安装或者升级你的@vue/cli
npm install -g @vue/cli

## 执行创建命令
vue create vue_test

##  随后选择3.x
##  Choose a version of Vue.js that you want to start the project with (Use arrow keys)
##  > 3.x
##    2.x

## 启动
cd vue_test
npm run serve
2、基于 vite 创建(推荐)
vite 是新一代前端构建工具,官网地址:https://vitejs.cn
vite 的优势如下:
-
轻量快速的热重载(
HMR),能实现极速的服务启动 -
对
TypeScript、JSX、CSS等支持开箱即用 -
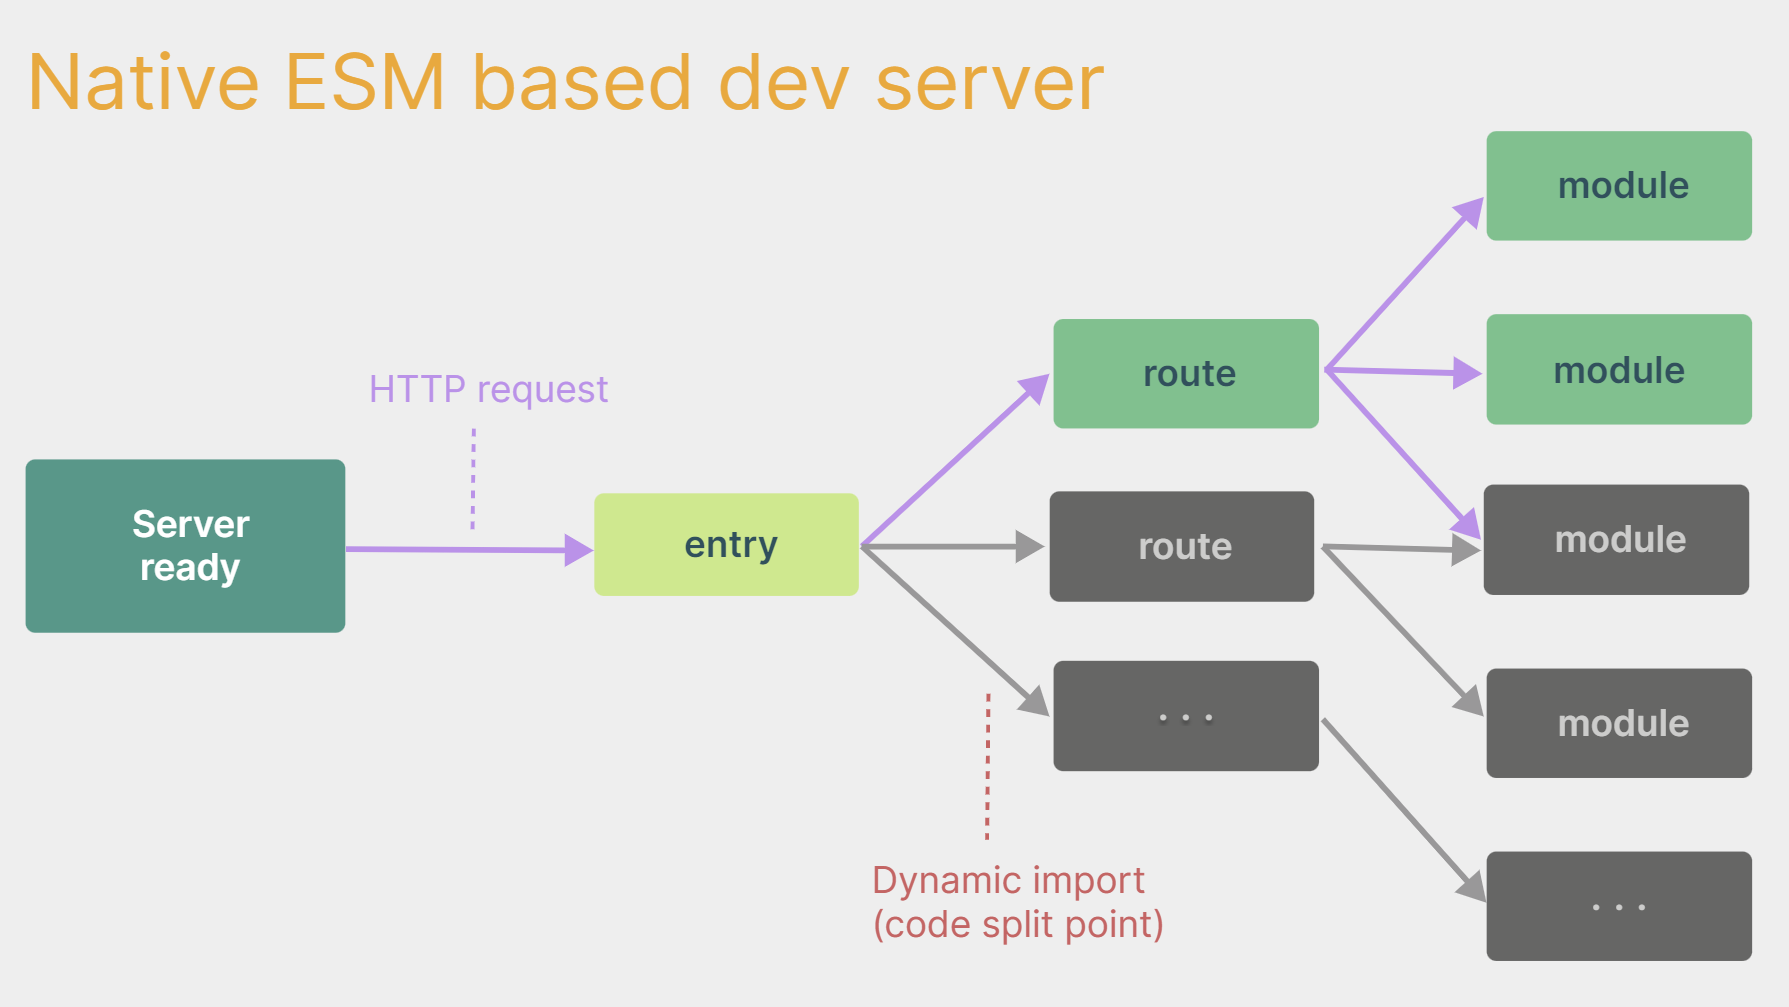
真正的按需编译,不再等待整个应用编译完成
-
webpack构建 与vite构建对比图如下: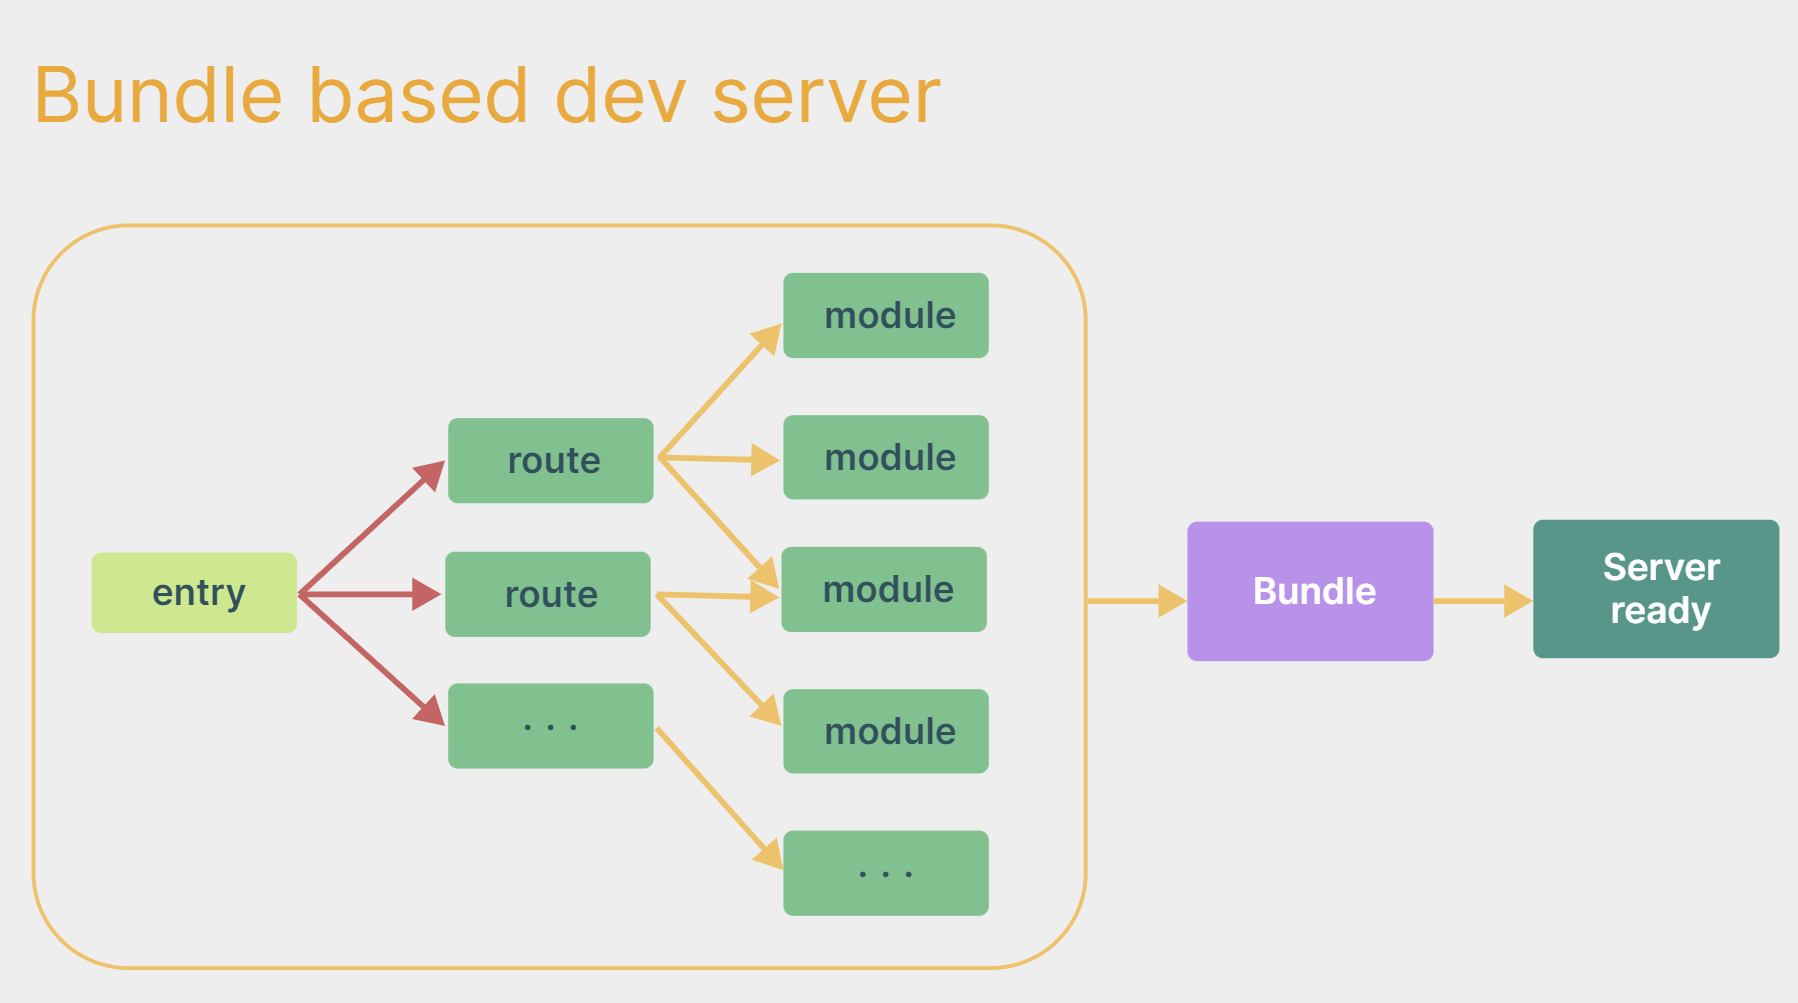
-
具体操作如下(点击查看官方文档)
## 1.创建命令
npm create vue@latest

## 2.具体配置
## 配置项目名称
√ Project name: vue3_test
## 是否添加 TypeScript支持
√ Add TypeScript?  Yes
## 是否添加 JSX 支持
√ Add JSX Support?  No
## 是否添加路由环境
√ Add Vue Router for Single Page Application development?  No
## 是否添加 pinia 环境
√ Add Pinia for state management?  No
## 是否添加单元测试
√ Add Vitest for Unit Testing?  No
## 是否添加端到端测试方案
√ Add an End-to-End Testing Solution? » No
## 是否添加 ESLint 语法检查
√ Add ESLint for code quality?  Yes
## 是否添加 Prettiert 代码格式化
√ Add Prettier for code formatting?  No
启动后可执行
npm i 安装所有依赖,此时会多一个文件
node_modules自己动手编写一个 App 组件:
<template>
  <div class="app">
    <h1>你好啊!</h1>
  </div>
</template>

<script lang="ts">
  export default {
    name:'App' //组件名
  }
</script>

<style>
  .app {
    background-color: #ddd;
    box-shadow: 0 0 10px;
    border-radius: 10px;
    padding: 20px;
  }
</style>
// 引入 createApp 用于创建应用
import { createApp } from "vue";
// 引入 App 根组件
import App from './app.vue'
// 创建应用实例并挂载到 index.html 中 id 为 app 的元素上
createApp(App).mount('#app')总结:
Vite项目中,index.html是项目的入口文件,在项目最外层- 加载
index.html后,Vite解析<script type="module" src="xxx">指向的JavaScript Vue3**中是通过 **createApp函数创建一个应用实例Vue3向下兼容Vue2语法,且Vue3中的模板中可以没有根标签
三、Vue3 核心语法
1、OptionsAPI 与 CompositionAPI
Vue2的API设计是Options(配置式 / 选项式)风格的Vue3的API设计是Composition(组合式)风格的
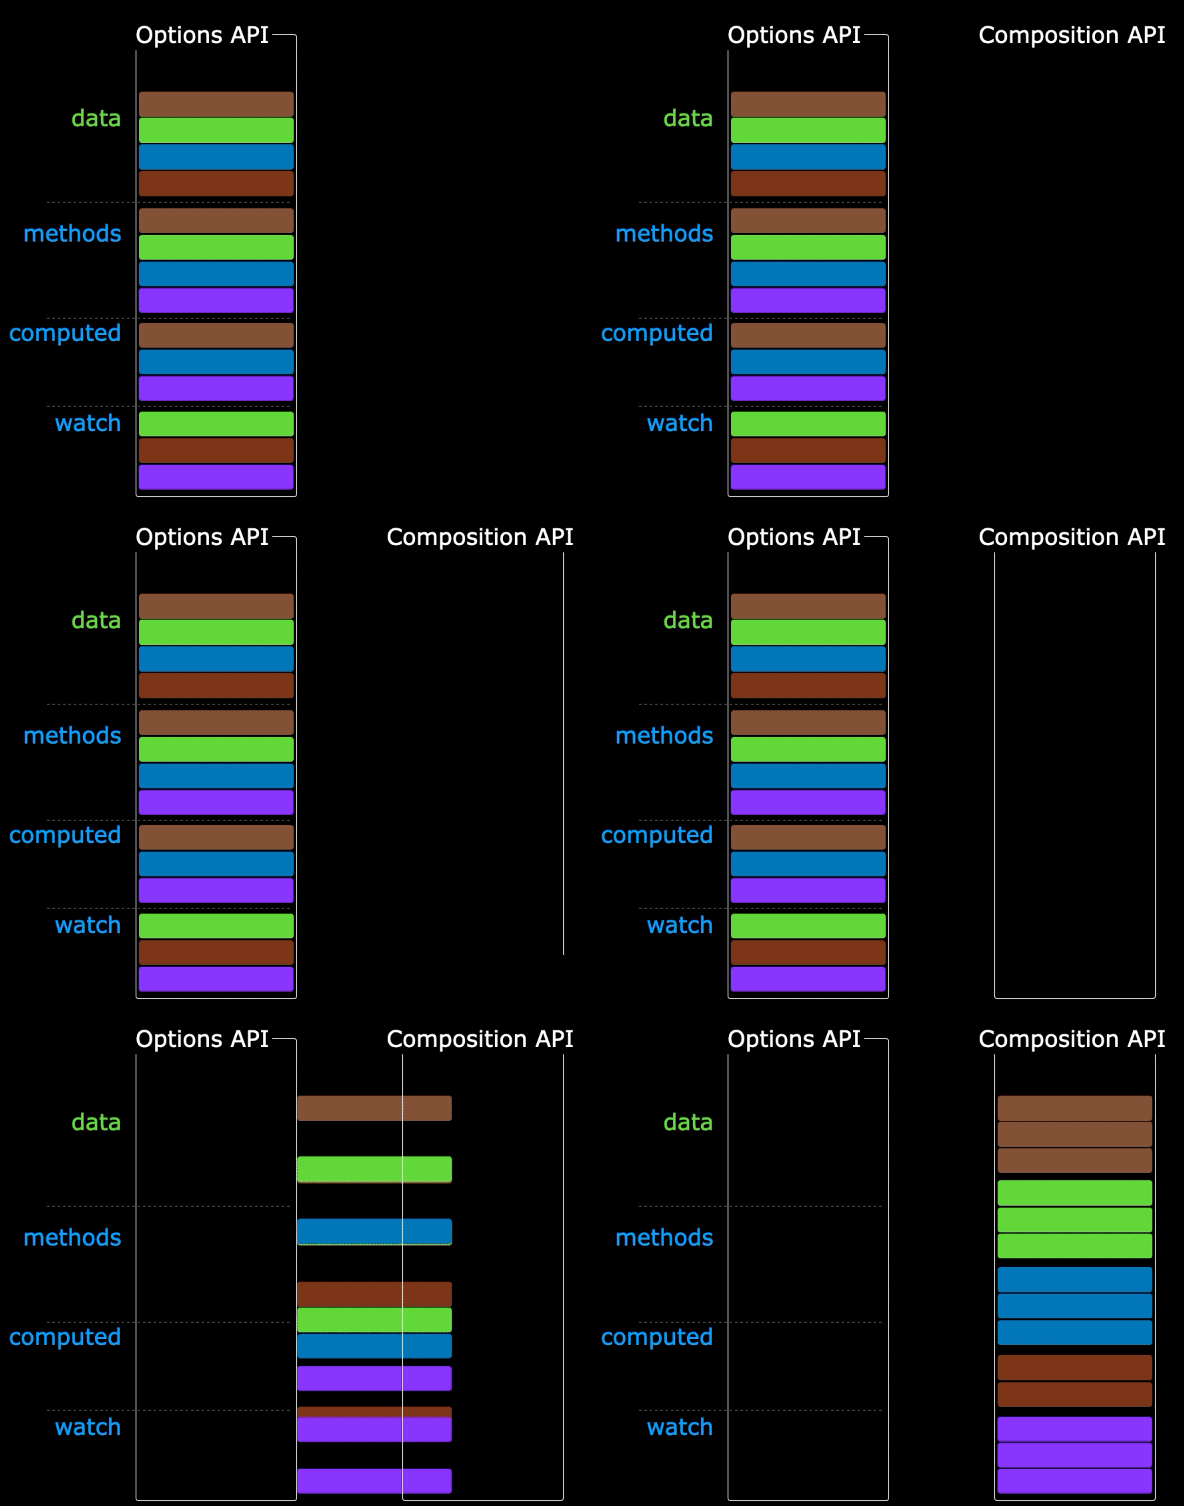
(1)Options API 的弊端
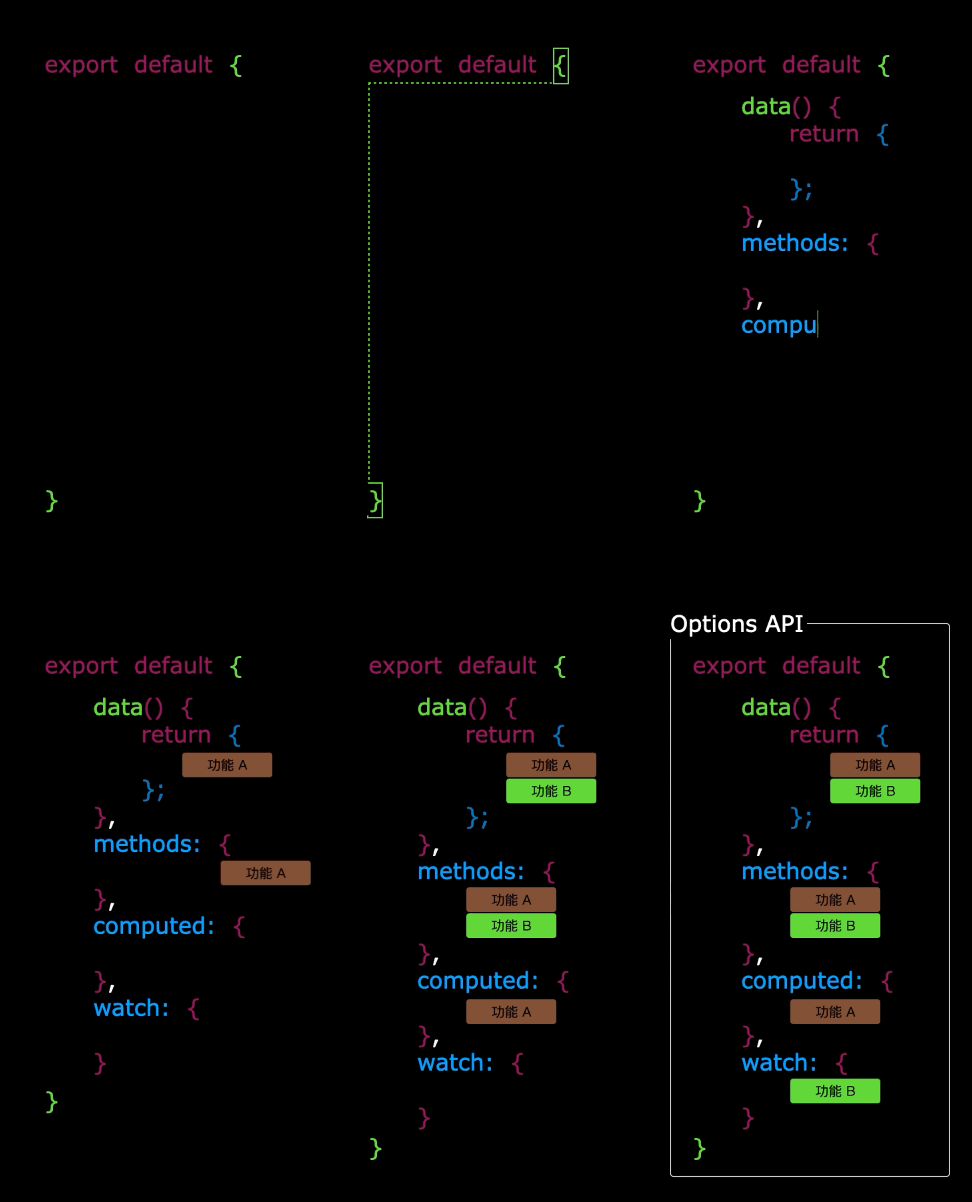
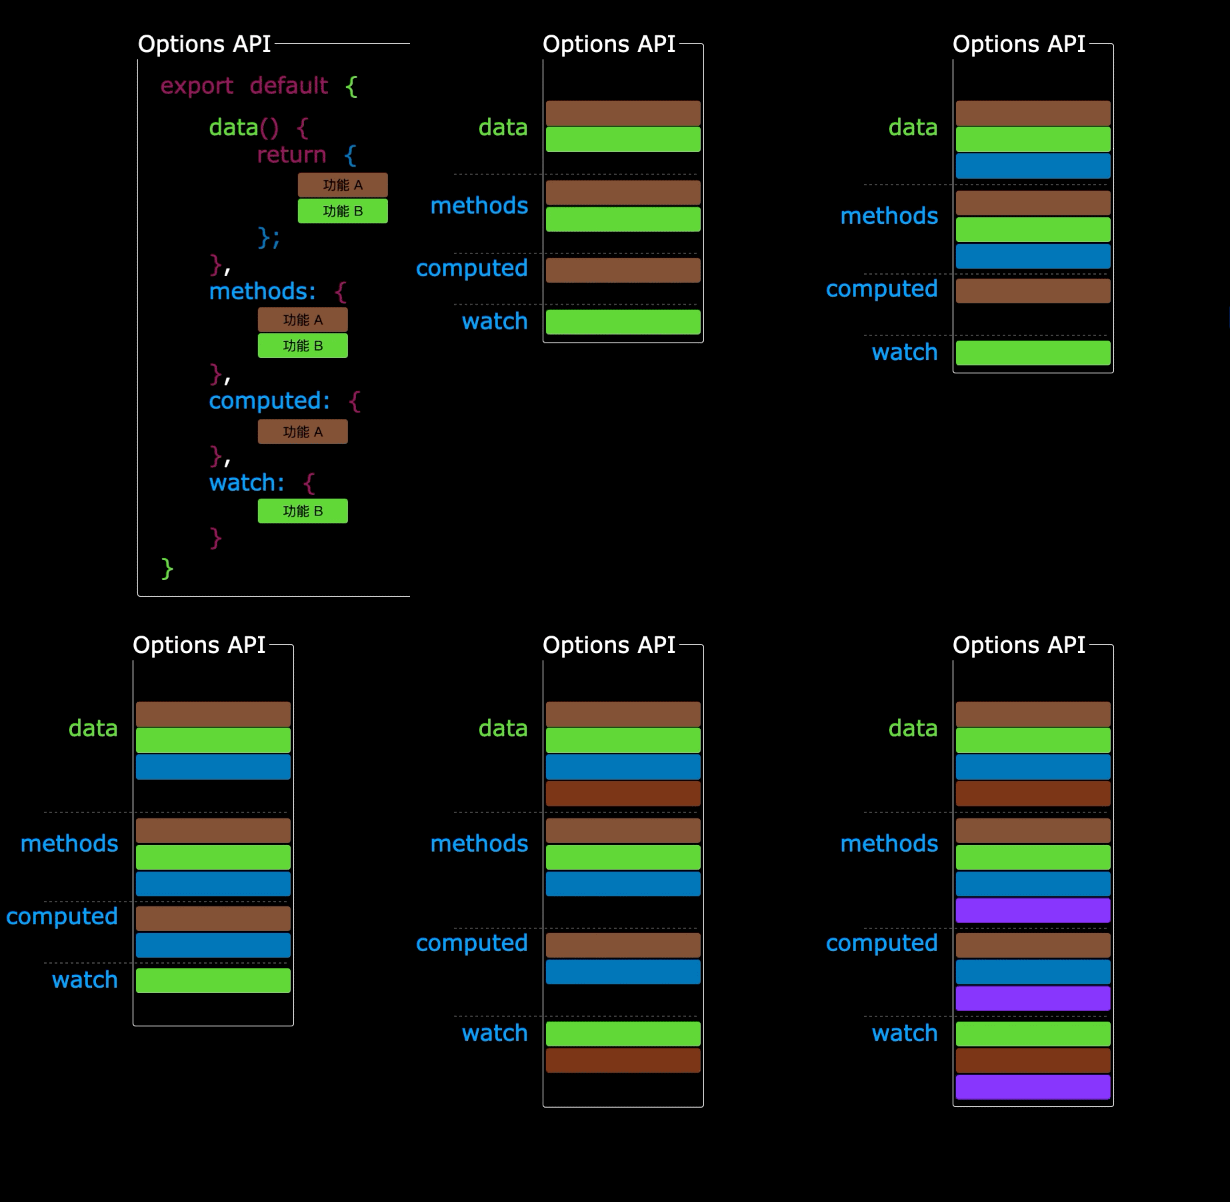
Options类型的 API,数据、方法、计算属性等,是分散在:data、methods、computed中的,若想新增或者修改一个需求,就需要分别修改:data、methods、computed,不便于维护和复用
 |  |
|---|
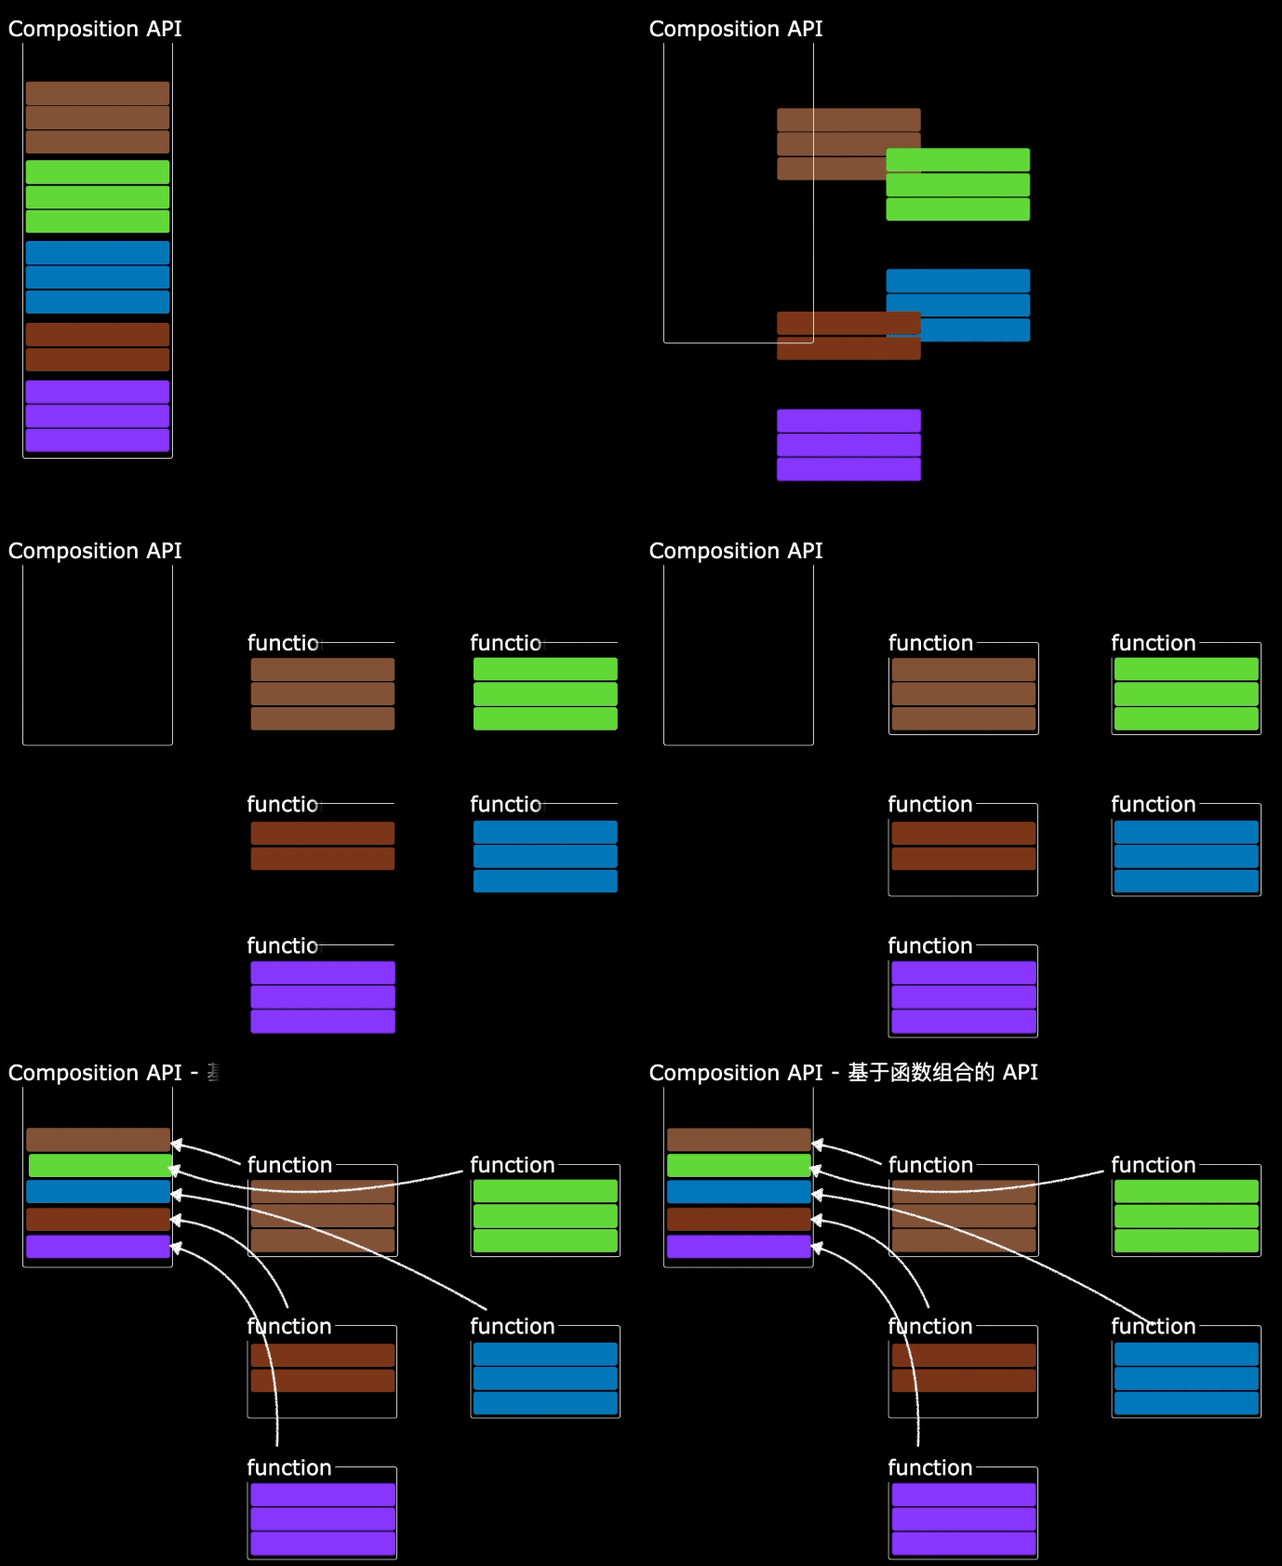
(2)Composition API 的优势
可以用函数的方式,更加优雅的组织代码,让相关功能的代码更加有序的组织在一起
 |  |
|---|
2、setup
(1)setup 概述
setup 是 Vue3 中一个新的配置项,值是一个函数,它是 Composition API “表演的舞台”,组件中所用到的:数据、方法、计算属性、监视…等等,均配置在setup中
特点如下:
setup函数返回的对象中的内容,可直接在模板中使用setup中访问this是undefinedsetup函数会在beforeCreate之前调用,它是“领先”所有钩子执行的
选项式:
<template>
    <div class="person">
        <h2>姓名:{{ name }}</h2>
        <h2>年龄:{{ age }}</h2>
        <button @click="showTel">查看联系方式</button>
    </div>
</template>

<script lang="ts">
    export default {
        name: 'Person',
        data(){
            return {
                name: 'harper',
                age: 18,
                tel: '12564561'
            }
        },
        methods:{
            showTel(){
                alert(this.tel)
            }
        },
        setup(){

        }
    }
</script>

<style scoped>
    .person {
        background-color: aqua;
        box-shadow: 0 0 10px;
        border-radius: 10px;
        padding: 20px;
    }
</style>
组合式:
<template>
  <div class="person">
    <h2>姓名:{{name}}</h2>
    <h2>年龄:{{age}}</h2>
    <button @click="changeName">修改名字</button>
    <button @click="changeAge">年龄+1</button>
    <button @click="showTel">点我查看联系方式</button>
  </div>
</template>

<script lang="ts">
  export default {
    name:'Person',
    setup(){
      // 数据,原来写在 data 中(注意:此时的 name、age、tel 数据都不是响应式数据)
      let name = '张三'
      let age = 18
      let tel = '13888888888'

      // 方法,原来写在 methods 中
      function changeName(){
        name = 'zhang-san' //注意:此时这么修改 name 页面是不变化的
        console.log(name)
      }
      function changeAge(){
        age += 1           //注意:此时这么修改 age 页面是不变化的
        console.log(age)
      }
      function showTel(){
        alert(tel)
      }

      // 返回一个对象,对象中的内容,模板中可以直接使用
      return {name,age,tel,changeName,changeAge,showTel}
    }
  }
</script>
此时点击按钮并没有效果,但是控制台输出了修改后的值,这是因为 name、age、tel 数据都不是响应式数据(后续讲解)
(2)setup 的返回值
-
若返回一个对象:则对象中的属性、方法等,在模板中均可以直接使用(重点关注)
-
若返回一个函数:则可以自定义渲染内容,代码如下:
setup(){
  return ()=> '你好啊!'
}
(3)setup 与 Options API 的关系
Vue2的配置(data、methos…)中可以访问到setup中的属性、方法- 但在
setup中不能访问到Vue2的配置(data、methos…) - 如果与
Vue2冲突,则setup优先
(4)setup 语法糖
setup 函数有一个语法糖,这个语法糖,可以让我们把 setup 独立出去,代码如下:
<template>
  <div class="person">
    <h2>姓名:{{name}}</h2>
    <h2>年龄:{{age}}</h2>
    <button @click="changName">修改名字</button>
    <button @click="changAge">年龄+1</button>
    <button @click="showTel">点我查看联系方式</button>
  </div>
</template>

<script lang="ts">
  export default {
    name:'Person',
  }
</script>

<!-- 下面的写法是 setup 语法糖 -->
<script setup lang="ts">
  console.log(this) //undefined

  // 数据(注意:此时的 name、age、tel 都不是响应式数据)
  let name = '张三'
  let age = 18
  let tel = '13888888888'

  // 方法
  function changName(){
    name = '李四'   //注意:此时这么修改 name 页面是不变化的
  }
  function changAge(){
    console.log(age)
    age += 1       //注意:此时这么修改 age 页面是不变化的
  }
  function showTel(){
    alert(tel)
  }
</script>
扩展:
上述代码,还需要编写一个不写 setup 的 script 标签,去指定组件名字,比较麻烦,我们可以借助 vite 中的插件简化
-
第一步:
npm i vite-plugin-vue-setup-extend -D -
第二步:
vite.config.tsimport { defineConfig } from 'vite' import VueSetupExtend from 'vite-plugin-vue-setup-extend' export default defineConfig({ plugins: [ VueSetupExtend() ] }) -
第三步:
<script setup lang="ts" name="Person">
3、ref 创建:基本类型的响应式数据
- 作用:定义响应式变量
- 语法:
let xxx = ref(初始值) - 返回值:一个
RefImpl的实例对象,简称ref 对象或ref,ref对象的value属性是响应式的 - 注意点:
JS中操作数据需要:xxx.value,但模板中不需要.value,直接使用即可- 对于
let name = ref('张三')来说,name不是响应式的,name.value是响应式的
<template>
  <div class="person">
    <h2>姓名:{{name}}</h2>
    <h2>年龄:{{age}}</h2>
    <button @click="changeName">修改名字</button>
    <button @click="changeAge">年龄+1</button>
    <button @click="showTel">点我查看联系方式</button>
  </div>
</template>

<script setup lang="ts" name="Person">
  import {ref} from 'vue'
  // name 和 age 是一个 RefImpl 的实例对象,简称 ref 对象,它们的 value 属性是响应式的
  let name = ref('张三')
  let age = ref(18)
  // tel就是一个普通的字符串,不是响应式的
  let tel = '13888888888'

  function changeName(){
    // JS 中操作 ref 对象时候需要 .value
    name.value = '李四'
    console.log(name.value)

    // 注意:name 不是响应式的,name.value 是响应式的,所以如下代码并不会引起页面的更新
    // name = ref('zhang-san')
  }
  function changeAge(){
    // JS 中操作 ref 对象时候需要 .value
    age.value += 1
    console.log(age.value)
  }
  function showTel(){
    alert(tel)
  }
</script>
4、reactive 创建:对象类型的响应式数据
- 作用:定义一个响应式对象(基本类型不要用它,要用
ref,否则报错) - 语法:
let 响应式对象 = reactive(源对象) - **返回值:**一个
Proxy的实例对象,简称:响应式对象 - 注意点:
reactive定义的响应式数据是“深层次”的
<template>
  <div class="person">
    <h2>汽车信息:一台{{ car.brand }}汽车,价值{{ car.price }}万</h2>
    <h2>游戏列表:</h2>
    <ul>
      <li v-for="g in games" :key="g.id">{{ g.name }}</li>
    </ul>
    <h2>测试:{{obj.a.b.c.d}}</h2>
    <button @click="changeCarPrice">修改汽车价格</button>
    <button @click="changeFirstGame">修改第一游戏</button>
    <button @click="test">测试</button>
  </div>
</template>

<script lang="ts" setup name="Person">
import { reactive } from 'vue'

// 数据
let car = reactive({ brand: '奔驰', price: 100 })
let games = reactive([
  { id: 'ahsgdyfa01', name: '英雄联盟' },
  { id: 'ahsgdyfa02', name: '王者荣耀' },
  { id: 'ahsgdyfa03', name: '原神' }
])
let obj = reactive({
  a:{
    b:{
      c:{
        d:666
      }
    }
  }
})

function changeCarPrice() {
  car.price += 10
}
function changeFirstGame() {
  games[0].name = '流星蝴蝶剑'
}
function test(){
  obj.a.b.c.d = 999
}
</script>
5、ref 创建:对象类型的响应式数据
ref接收的数据可以是:基本类型、对象类型- 若
ref接收的是对象类型,内部其实也是调用了reactive函数
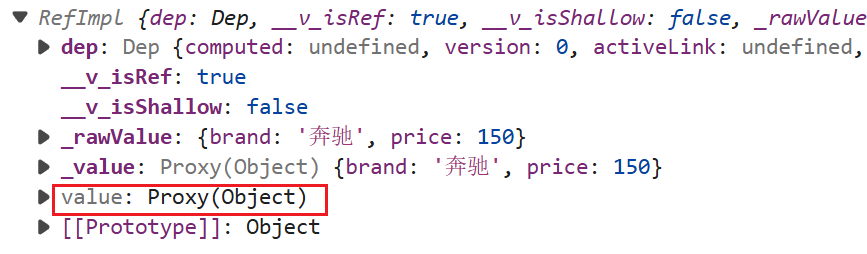
- ref:
RefImpl的实例对象 - reactive:
Proxy的实例对象
<template>
  <div class="person">
    <h2>汽车信息:一台{{ car.brand }}汽车,价值{{ car.price }}万</h2>
    <button @click="changeCarPrice">修改汽车价格</button>
  </div>
</template>

<script lang="ts" setup name="Person">
import { ref } from 'vue'

// 数据
let car = ref({ brand: '奔驰', price: 100 })

console.log(car)

function changeCarPrice() {
  car.value.price += 10
}
</script>
6、ref 对比 reactive
宏观角度看:
-
ref用来定义:基本类型数据、对象类型数据 -
reactive用来定义:对象类型数据
区别:
-
ref创建的变量必须使用.value(可以使用volar插件自动添加.value) -
reactive重新分配一个新对象,会失去响应式(可以使用Object.assign去整体替换)reactive:<template> <div class="person"> <h2>汽车信息:一辆{{car.brand}}车,价值{{car.price}}万</h2> <button @click="changePrice">修改汽车的价格</button> <button @click="changeCar">修改汽车</button> </div> </template> <script lang="ts" setup name="Person"> import {ref,reactive} from 'vue' let car = reactive({brand:'奔驰',price:100}) let sum = ref(0) function changePrice(){ car.price += 10 } function changeCar(){ Object.assign(car,{brand:'奥拓',price:1}) } </script>ref:<template> <div class="person"> <h2>汽车信息:一辆{{car.brand}}车,价值{{car.price}}万</h2> <button @click="changePrice">修改汽车的价格</button> <button @click="changeCar">修改汽车</button> </div> </template> <script lang="ts" setup name="Person"> import {ref,reactive} from 'vue' let car = ref({brand:'奔驰',price:100}) function changePrice(){ car.value.price += 10 } function changeCar(){ car.value = {brand:'奥拓',price:1} } </script>但是
ref不能越过.value,如:let sum = ref(0) function changeSum(){ sum = ref(9) }
使用原则:
- 若需要一个基本类型的响应式数据,必须使用
ref - 若需要一个响应式对象,层级不深,
ref、reactive都可以 - 若需要一个响应式对象,且层级较深,推荐使用
reactive
7、toRefs 与 toRef
- 作用:将一个响应式对象中的每一个属性,转换为
ref对象 - 备注:
toRefs与toRef功能一致,但toRefs可以批量转换 - 语法如下:
<template>
  <div class="person">
    <h2>姓名:{{person.name}}</h2>
    <h2>年龄:{{person.age}}</h2>
    <h2>性别:{{person.gender}}</h2>
    <button @click="changeName">修改名字</button>
    <button @click="changeAge">修改年龄</button>
    <button @click="changeGender">修改性别</button>
  </div>
</template>

<script lang="ts" setup name="Person">
  import {ref,reactive,toRefs,toRef} from 'vue'

  let person = reactive({name:'张三', age:18, gender:'男'})

  // 通过toRefs将person对象中的n个属性批量取出,且依然保持响应式的能力
  let {name,gender} =  toRefs(person)

  // 通过toRef将person对象中的gender属性取出,且依然保持响应式的能力
  let age = toRef(person,'age')

  function changeName(){
    name.value += '~'
  }
  function changeAge(){
    age.value += 1
  }
  function changeGender(){
    gender.value = '女'
  }
</script>
8、computed
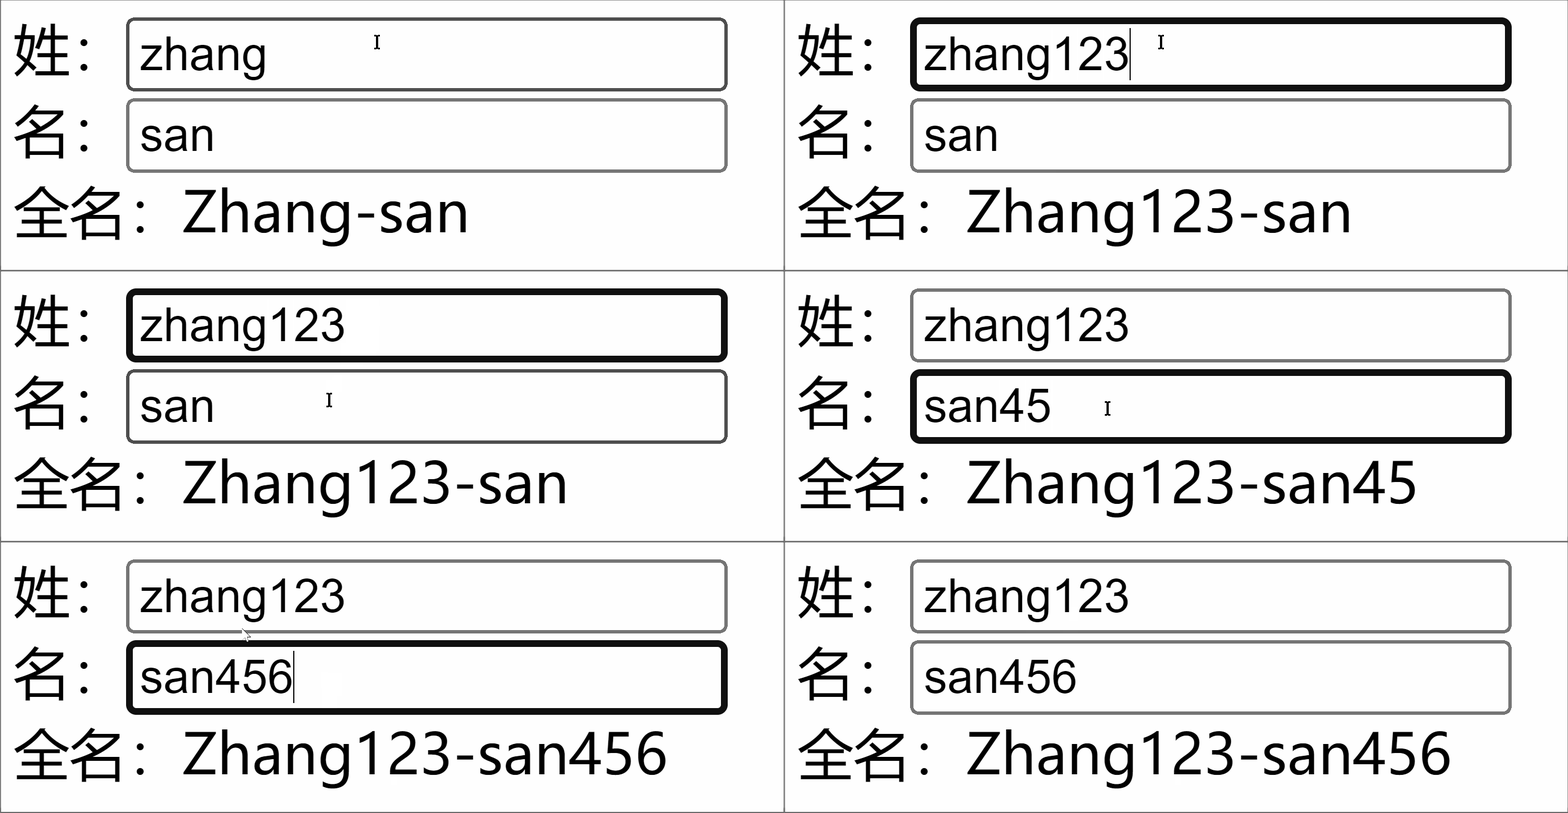
作用:根据已有数据计算出新数据
<template>
  <div class="person">
    姓:<input type="text" v-model="firstName"> <br>
    名:<input type="text" v-model="lastName"> <br>
    全名:<span>{{fullName}}</span> <br>
    <button @click="changeFullName">全名改为:li-si</button>
  </div>
</template>

<script setup lang="ts" name="App">
  import {ref,computed} from 'vue'

  let firstName = ref('zhang')
  let lastName = ref('san')

  // 计算属性 —— 只读取,不修改(本质是修改了 firstName 和 lastName,引起了 fullName 的变化)
  /* let fullName = computed(()=>{
    return firstName.value + '-' + lastName.value
  }) */

  // 计算属性 —— 既读取又修改
  let fullName = computed({
    // 读取
    get(){
      return firstName.value + '-' + lastName.value
    },
    // 修改
    set(val){
      console.log('有人修改了 fullName',val)
      firstName.value = val.split('-')[0]
      lastName.value = val.split('-')[1]
    }
  })

  function changeFullName(){
    fullName.value = 'li-si'
  }
</script>
其中:
-
v-bind是单向绑定,即只能由数据流向页面,不能由页面流回数据,可简写为:姓:<input type="text" :value="firstName"> -
v-model是双向绑定 -
方法没有缓存 -
属性计算有缓存
9、watch
- 作用:监视数据的变化
- 特点:
Vue3中的watch只能监视以下四种数据:ref定义的数据reactive定义的数据- 函数返回一个值(
getter函数) - 一个包含上述内容的数组
我们在 Vue3 中使用 watch 的时候,通常会遇到以下几种情况:
(1)情况一
监视 ref 定义的基本类型数据:
直接写数据名即可,监视的是其 value 值的改变
<template>
  <div class="person">
    <h1>情况一:监视【ref】定义的【基本类型】数据</h1>
    <h2>当前求和为:{{sum}}</h2>
    <button @click="changeSum">点我sum+1</button>
  </div>
</template>

<script lang="ts" setup name="Person">
  import {ref,watch} from 'vue'

  let sum = ref(0)

  function changeSum(){
    sum.value += 1
  }
  // 监视,情况一:监视【ref】定义的【基本类型】数据
  const stopWatch = watch(sum,(newValue,oldValue)=>{
    console.log('sum变化了',newValue,oldValue)
    if(newValue >= 10){
      stopWatch()
    }
  })
</script>
(2)情况二
监视 ref 定义的对象类型数据:
直接写数据名,监视的是对象的地址值,若想监视对象内部的数据,要手动开启深度监视
<template>
  <div class="person">
    <h1>情况二:监视【ref】定义的【对象类型】数据</h1>
    <h2>姓名:{{ person.name }}</h2>
    <h2>年龄:{{ person.age }}</h2>
    <button @click="changeName">修改名字</button>
    <button @click="changeAge">修改年龄</button>
    <button @click="changePerson">修改整个人</button>
  </div>
</template>

<script lang="ts" setup name="Person">
  import {ref,watch} from 'vue'

  let person = ref({
    name:'张三',
    age:18
  })

  function changeName(){
    person.value.name += '~'
  }
  function changeAge(){
    person.value.age += 1
  }
  function changePerson(){
    person.value = {name:'李四',age:90}
  }
  /*
    监视,情况一:监视【ref】定义的【对象类型】数据,监视的是对象的地址值,若想监视对象内部属性的变化,需要手动开启深度监视
    watch 的第一个参数是:被监视的数据
    watch 的第二个参数是:监视的回调
    watch 的第三个参数是:配置对象(deep、immediate 等等.....)
  */
  watch(person,(newValue,oldValue)=>{
    console.log('person变化了',newValue,oldValue)
  },{deep:true})

</script>
注意:
- 若修改的是
ref定义的对象中的属性,newValue和oldValue都是新值,因为它们是同一个对象- 若修改整个
ref定义的对象,newValue是新值,oldValue是旧值,因为不是同一个对象了
(3)情况三
监视 reactive 定义的对象类型数据,且默认开启了深度监视
<template>
  <div class="person">
    <h1>情况三:监视【reactive】定义的【对象类型】数据</h1>
    <h2>姓名:{{ person.name }}</h2>
    <h2>年龄:{{ person.age }}</h2>
    <button @click="changeName">修改名字</button>
    <button @click="changeAge">修改年龄</button>
    <button @click="changePerson">修改整个人</button>
  </div>
</template>

<script lang="ts" setup name="Person">
  import {reactive,watch} from 'vue'

  let person = reactive({
    name:'张三',
    age:18
  })

  function changeName(){
    person.name += '~'
  }
  function changeAge(){
    person.age += 1
  }
  function changePerson(){
    Object.assign(person,{name:'李四',age:80})
  }

  // 监视,情况三:监视【reactive】定义的【对象类型】数据,且默认是开启深度监视的
  watch(person,(newValue,oldValue)=>{
    console.log('person 变化了',newValue,oldValue)
  })
</script>
(4)情况四
监视 ref 或 reactive 定义的对象类型数据中的某个属性,注意点如下:
- 若该属性值不是
对象类型,需要写成函数形式 - 若该属性值是依然是
对象类型,可直接编,也可写成函数,建议写成函数
结论:
监视的要是对象里的属性,那么最好写函数式
注意点:
若是对象监视的是地址值,需要关注对象内部,需要手动开启深度监视
<template>
  <div class="person">
    <h1>情况四:监视【ref】或【reactive】定义的【对象类型】数据中的某个属性</h1>
    <h2>姓名:{{ person.name }}</h2>
    <h2>年龄:{{ person.age }}</h2>
    <h2>汽车:{{ person.car.c1 }}、{{ person.car.c2 }}</h2>
    <button @click="changeName">修改名字</button>
    <button @click="changeAge">修改年龄</button>
    <button @click="changeC1">修改第一台车</button>
    <button @click="changeC2">修改第二台车</button>
    <button @click="changeCar">修改整个车</button>
  </div>
</template>

<script lang="ts" setup name="Person">
  import {reactive,watch} from 'vue'

  let person = reactive({
    name:'张三',
    age:18,
    car:{
      c1:'奔驰',
      c2:'宝马'
    }
  })

  function changeName(){
    person.name += '~'
  }
  function changeAge(){
    person.age += 1
  }
  function changeC1(){
    person.car.c1 = '奥迪'
  }
  function changeC2(){
    person.car.c2 = '大众'
  }
  function changeCar(){
    person.car = {c1:'雅迪',c2:'爱玛'}
  }

  // 监视,情况四:监视响应式对象中的某个属性,且该属性是基本类型的,要写成函数式
  /* watch(()=> person.name,(newValue,oldValue)=>{
    console.log('person.name 变化了',newValue,oldValue)
  }) */

  // 监视,情况四:监视响应式对象中的某个属性,且该属性是对象类型的,可以直接写,也能写函数,更推荐写函数
  watch(()=>person.car,(newValue,oldValue)=>{
    console.log('person.car 变化了',newValue,oldValue)
  },{deep:true})
</script>
(5)情况五
监视上述的多个数据
<template>
  <div class="person">
    <h1>情况五:监视上述的多个数据</h1>
    <h2>姓名:{{ person.name }}</h2>
    <h2>年龄:{{ person.age }}</h2>
    <h2>汽车:{{ person.car.c1 }}、{{ person.car.c2 }}</h2>
    <button @click="changeName">修改名字</button>
    <button @click="changeAge">修改年龄</button>
    <button @click="changeC1">修改第一台车</button>
    <button @click="changeC2">修改第二台车</button>
    <button @click="changeCar">修改整个车</button>
  </div>
</template>

<script lang="ts" setup name="Person">
  import {reactive,watch} from 'vue'

  let person = reactive({
    name:'张三',
    age:18,
    car:{
      c1:'奔驰',
      c2:'宝马'
    }
  })

  function changeName(){
    person.name += '~'
  }
  function changeAge(){
    person.age += 1
  }
  function changeC1(){
    person.car.c1 = '奥迪'
  }
  function changeC2(){
    person.car.c2 = '大众'
  }
  function changeCar(){
    person.car = {c1:'雅迪',c2:'爱玛'}
  }

  // 监视,情况五:监视上述的多个数据
  watch([()=>person.name,person.car],(newValue,oldValue)=>{
    console.log('person.car变化了',newValue,oldValue)
  },{deep:true})

</script>
10、watchEffect
官网:立即运行一个函数,同时响应式地追踪其依赖,并在依赖更改时重新执行该函数
watch 对比 watchEffect:
-
都能监听响应式数据的变化,不同的是监听数据变化的方式不同
-
watch:要明确指出监视的数据 -
watchEffect:不用明确指出监视的数据(函数中用到哪些属性,那就监视哪些属性)
示例代码:
<template>
  <div class="person">
    <h1>需求:水温达到 50℃,或水位达到 20cm,则联系服务器</h1>
    <h2 id="demo">水温:{{temp}}</h2>
    <h2>水位:{{height}}</h2>
    <button @click="changePrice">水温+1</button>
    <button @click="changeSum">水位+10</button>
  </div>
</template>

<script lang="ts" setup name="Person">
  import {ref,watch,watchEffect} from 'vue'

  let temp = ref(0)
  let height = ref(0)

  function changePrice(){
    temp.value += 10
  }
  function changeSum(){
    height.value += 1
  }

  // 用 watch 实现,需要明确的指出要监视:temp、height
  watch([temp,height],(value)=>{
    // 从 value 中获取最新的 temp 值、height 值
    const [newTemp,newHeight] = value
    // 室温达到 50℃,或水位达到 20cm,立刻联系服务器
    if(newTemp >= 50 || newHeight >= 20){
      console.log('联系服务器')
    }
  })

  // 用 watchEffect 实现,不用
  const stopWtach = watchEffect(()=>{
    // 室温达到 50℃,或水位达到 20cm,立刻联系服务器
    if(temp.value >= 50 || height.value >= 20){
      console.log(document.getElementById('demo')?.innerText)
      console.log('联系服务器')
    }
    // 水温达到 100,或水位达到 50,取消监视
    if(temp.value === 100 || height.value === 50){
      console.log('清理了')
      stopWtach()
    }
  })
</script>
11、标签的 ref 属性
作用:用于注册模板引用
-
用在普通
DOM标签上,获取的是DOM节点 -
用在组件标签上,获取的是组件实例对象
-
如果通过
id获取元素,多个 vue 文件的 id 值可能会冲突,style中的样式也类似,所以我们需要加scoped,添加局部样式,以防与其他页面冲突
用在普通 DOM 标签上:
<template>
  <div class="person">
    <h1>中国</h1>
    <h2 ref="title">深圳</h2>
    <h3>Harper</h3>
    <button @click="showLog">点我输出h2这个元素</button>
  </div>
</template>

<script lang="ts" setup name="Person">
  import {ref} from 'vue'

  // 创建一个 title2,用于存储 ref 标记的内容
  let title = ref()

  function showLog(){
    console.log(title.value)
  }
  defineExpose({a,b,c})
</script>
用在组件标签上:
<!-- 父组件 App.vue -->
<template>
  <Person ref="ren"/>
  <button @click="test">测试</button>
</template>

<script lang="ts" setup name="App">
  import Person from './components/Person.vue'
  import {ref} from 'vue'

  let ren = ref()

  function test(){
    console.log(ren.value.name)
    console.log(ren.value.age)
  }
</script>


<!-- 子组件 Person.vue 中要使用 defineExpose 暴露内容 -->
<script lang="ts" setup name="Person">
  import {ref,defineExpose} from 'vue'

  let name = ref('张三')
  let age = ref(18)

  // 使用 defineExpose 将组件中的数据交给外部
  defineExpose({name,age})
</script>
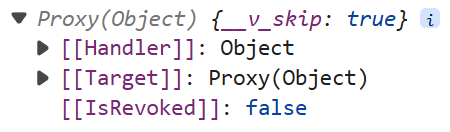
在 Person.vue 文件(子)中的数据,在 app.vue 中不能直接拿到,这是 vue3 的数据保护措施,如果想要拿到详细的数据,需要用
defineExpose将组件中的数据交给外部
12、props
// index.ts
// 定义一个接口,限制每个 Person 对象的格式
export interface PersonInter {
    id: string,
    name: string,
    age: number
}

// 定义一个自定义类型 Persons
export type Persons = Array<PersonInter>
App.vue 中代码:
<template>
	<Person :list="persons"/>
</template>

<script lang="ts" setup name="App">
    import Person from './components/Person.vue'
    import {reactive} from 'vue'
    import {type Persons} from './types'

    let persons = reactive<Persons>([
        {id:'e98219e12',name:'张三',age:18},
        {id:'e98219e13',name:'李四',age:19},
        {id:'e98219e14',name:'王五',age:20}
    ])
</script>
Person.vue 中代码:
<template>
<div class="person">
<ul>
    <li v-for="item in list" :key="item.id">
      	{{item.name}}--{{item.age}}
    </li>
</ul>
</div>
</template>

<script lang="ts" setup name="Person">
import {defineProps} from 'vue'
import {type PersonInter} from '@/types'

// 第一种写法:仅接收
// const props = defineProps(['list'])

// 第二种写法:接收 + 限制类型
// defineProps<{list:Persons}>()

// 第三种写法:接收 + 限制类型 + 指定默认值 + 限制必要性
let props = withDefaults(defineProps<{list?:Persons}>(),{
	list:()=>[{id:'asdasg01',name:'小猪佩奇',age:18}]
})
console.log(props)
</script>
13、生命周期
(1)概念:
Vue 组件实例在创建时要经历一系列的初始化步骤,在此过程中 Vue 会在合适的时机,调用特定的函数,从而让开发者有机会在特定阶段运行自己的代码,这些特定的函数统称为:生命周期钩子
(2)规律:
生命周期整体分为四个阶段,分别是:创建、挂载、更新、销毁,每个阶段都有两个钩子,一前一后
(3)Vue2 的生命周期
- 创建阶段:
beforeCreate、created - 挂载阶段:
beforeMount、mounted - 更新阶段:
beforeUpdate、updated - 销毁阶段:
beforeDestroy、destroyed
(4)Vue3 的生命周期
- 创建阶段:
setup - 挂载阶段:
onBeforeMount、onMounted - 更新阶段:
onBeforeUpdate、onUpdated - 卸载阶段:
onBeforeUnmount、onUnmounted
(6)常用的钩子
onMounted(挂载完毕)onUpdated(更新完毕)onBeforeUnmount(卸载之前)
示例代码:
<template>
  <div class="person">
    <h2>当前求和为:{{ sum }}</h2>
    <button @click="changeSum">点我sum+1</button>
  </div>
</template>

<!-- vue3 写法 -->
<script lang="ts" setup name="Person">
  import {
    ref,
    onBeforeMount,
    onMounted,
    onBeforeUpdate,
    onUpdated,
    onBeforeUnmount,
    onUnmounted
  } from 'vue'

  let sum = ref(0)

  function changeSum() {
    sum.value += 1
  }
  console.log('setup')
  // 生命周期钩子
  onBeforeMount(()=>{
    console.log('挂载之前')
  })
  onMounted(()=>{
    console.log('挂载完毕')
  })
  onBeforeUpdate(()=>{
    console.log('更新之前')
  })
  onUpdated(()=>{
    console.log('更新完毕')
  })
  onBeforeUnmount(()=>{
    console.log('卸载之前')
  })
  onUnmounted(()=>{
    console.log('卸载完毕')
  })
</script>
先加载子组件,再加载父组件,所以 app.vue 是最后加载的
14、自定义 hook
-
什么是
hook—— 本质是一个函数,把setup函数中使用的Composition API进行了封装,类似于vue2.x中的mixin -
自定义
hook的优势:复用代码,让setup中的逻辑更清楚易懂
示例代码:
-
useSum.ts中内容如下:import {ref,onMounted} from 'vue' export default function(){ let sum = ref(0) const increment = ()=>{ sum.value += 1 } const decrement = ()=>{ sum.value -= 1 } onMounted(()=>{ increment() }) //向外部暴露数据 return {sum,increment,decrement} } -
useDog.ts中内容如下:(先安装 axios)
npm i axiosimport {reactive,onMounted} from 'vue' import axios,{AxiosError} from 'axios' export default function(){ let dogList = reactive<string[]>([]) // 方法 async function getDog(){ try { // 发请求 let {data} = await axios.get('https://dog.ceo/api/breed/pembroke/images/random') // 维护数据 dogList.push(data.message) } catch (error) { // 处理错误 const err = <AxiosError>error console.log(err.message) } } // 挂载钩子 onMounted(()=>{ getDog() }) //向外部暴露数据 return {dogList,getDog} } -
组件中具体使用:
<template>
  <h2>当前求和为:{{sum}}</h2>
  <button @click="increment">点我+1</button>
  <button @click="decrement">点我-1</button>
  <hr>
  <img v-for="(u,index) in dogList" :key="index" :src="(u as string)">
  <span v-show="dogList">加载中......</span><br>
  <button @click="getDog">再来一只狗</button>
</template>

<script lang="ts">
  import {defineComponent} from 'vue'

  export default defineComponent({
    name:'App',
  })
</script>

<script setup lang="ts">
  import useSum from '@/hooks/useSum'
  import useDog from '@/hooks/useDog'

  let {sum,increment,decrement} = useSum()
  let {dogList,getDog} = useDog()
</script>

<style scoped>
    img {
      width: 150px;
    }
</style>
四、路由
1、对路由的理解
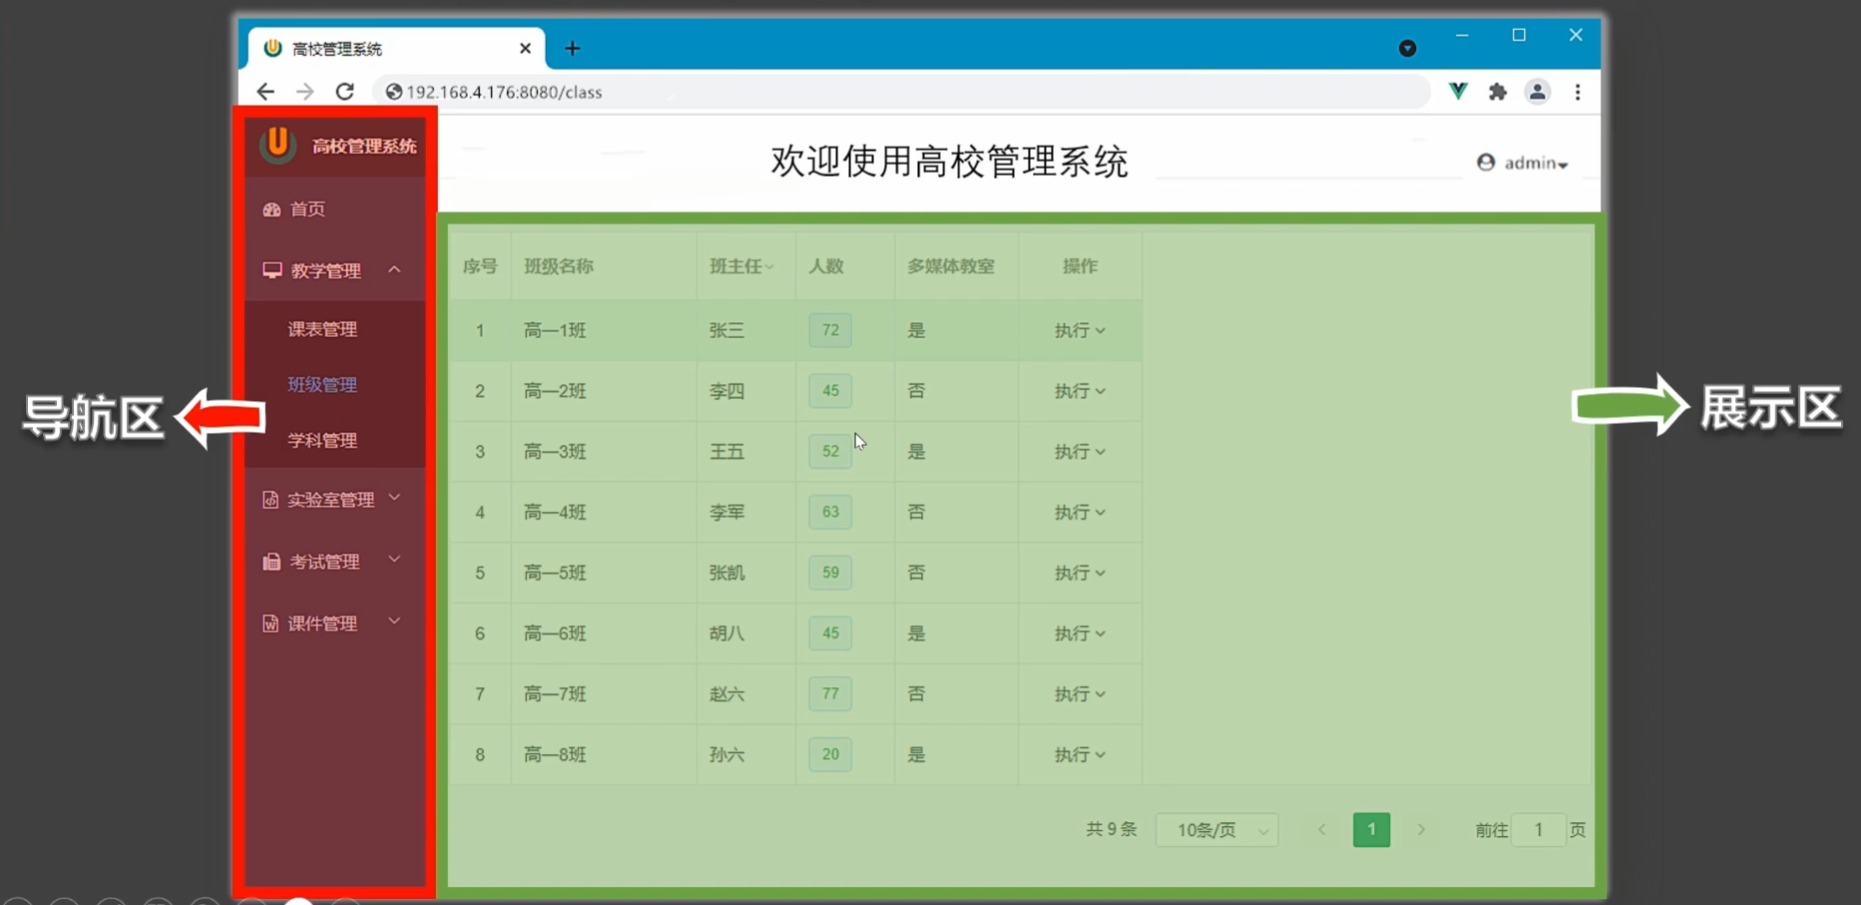
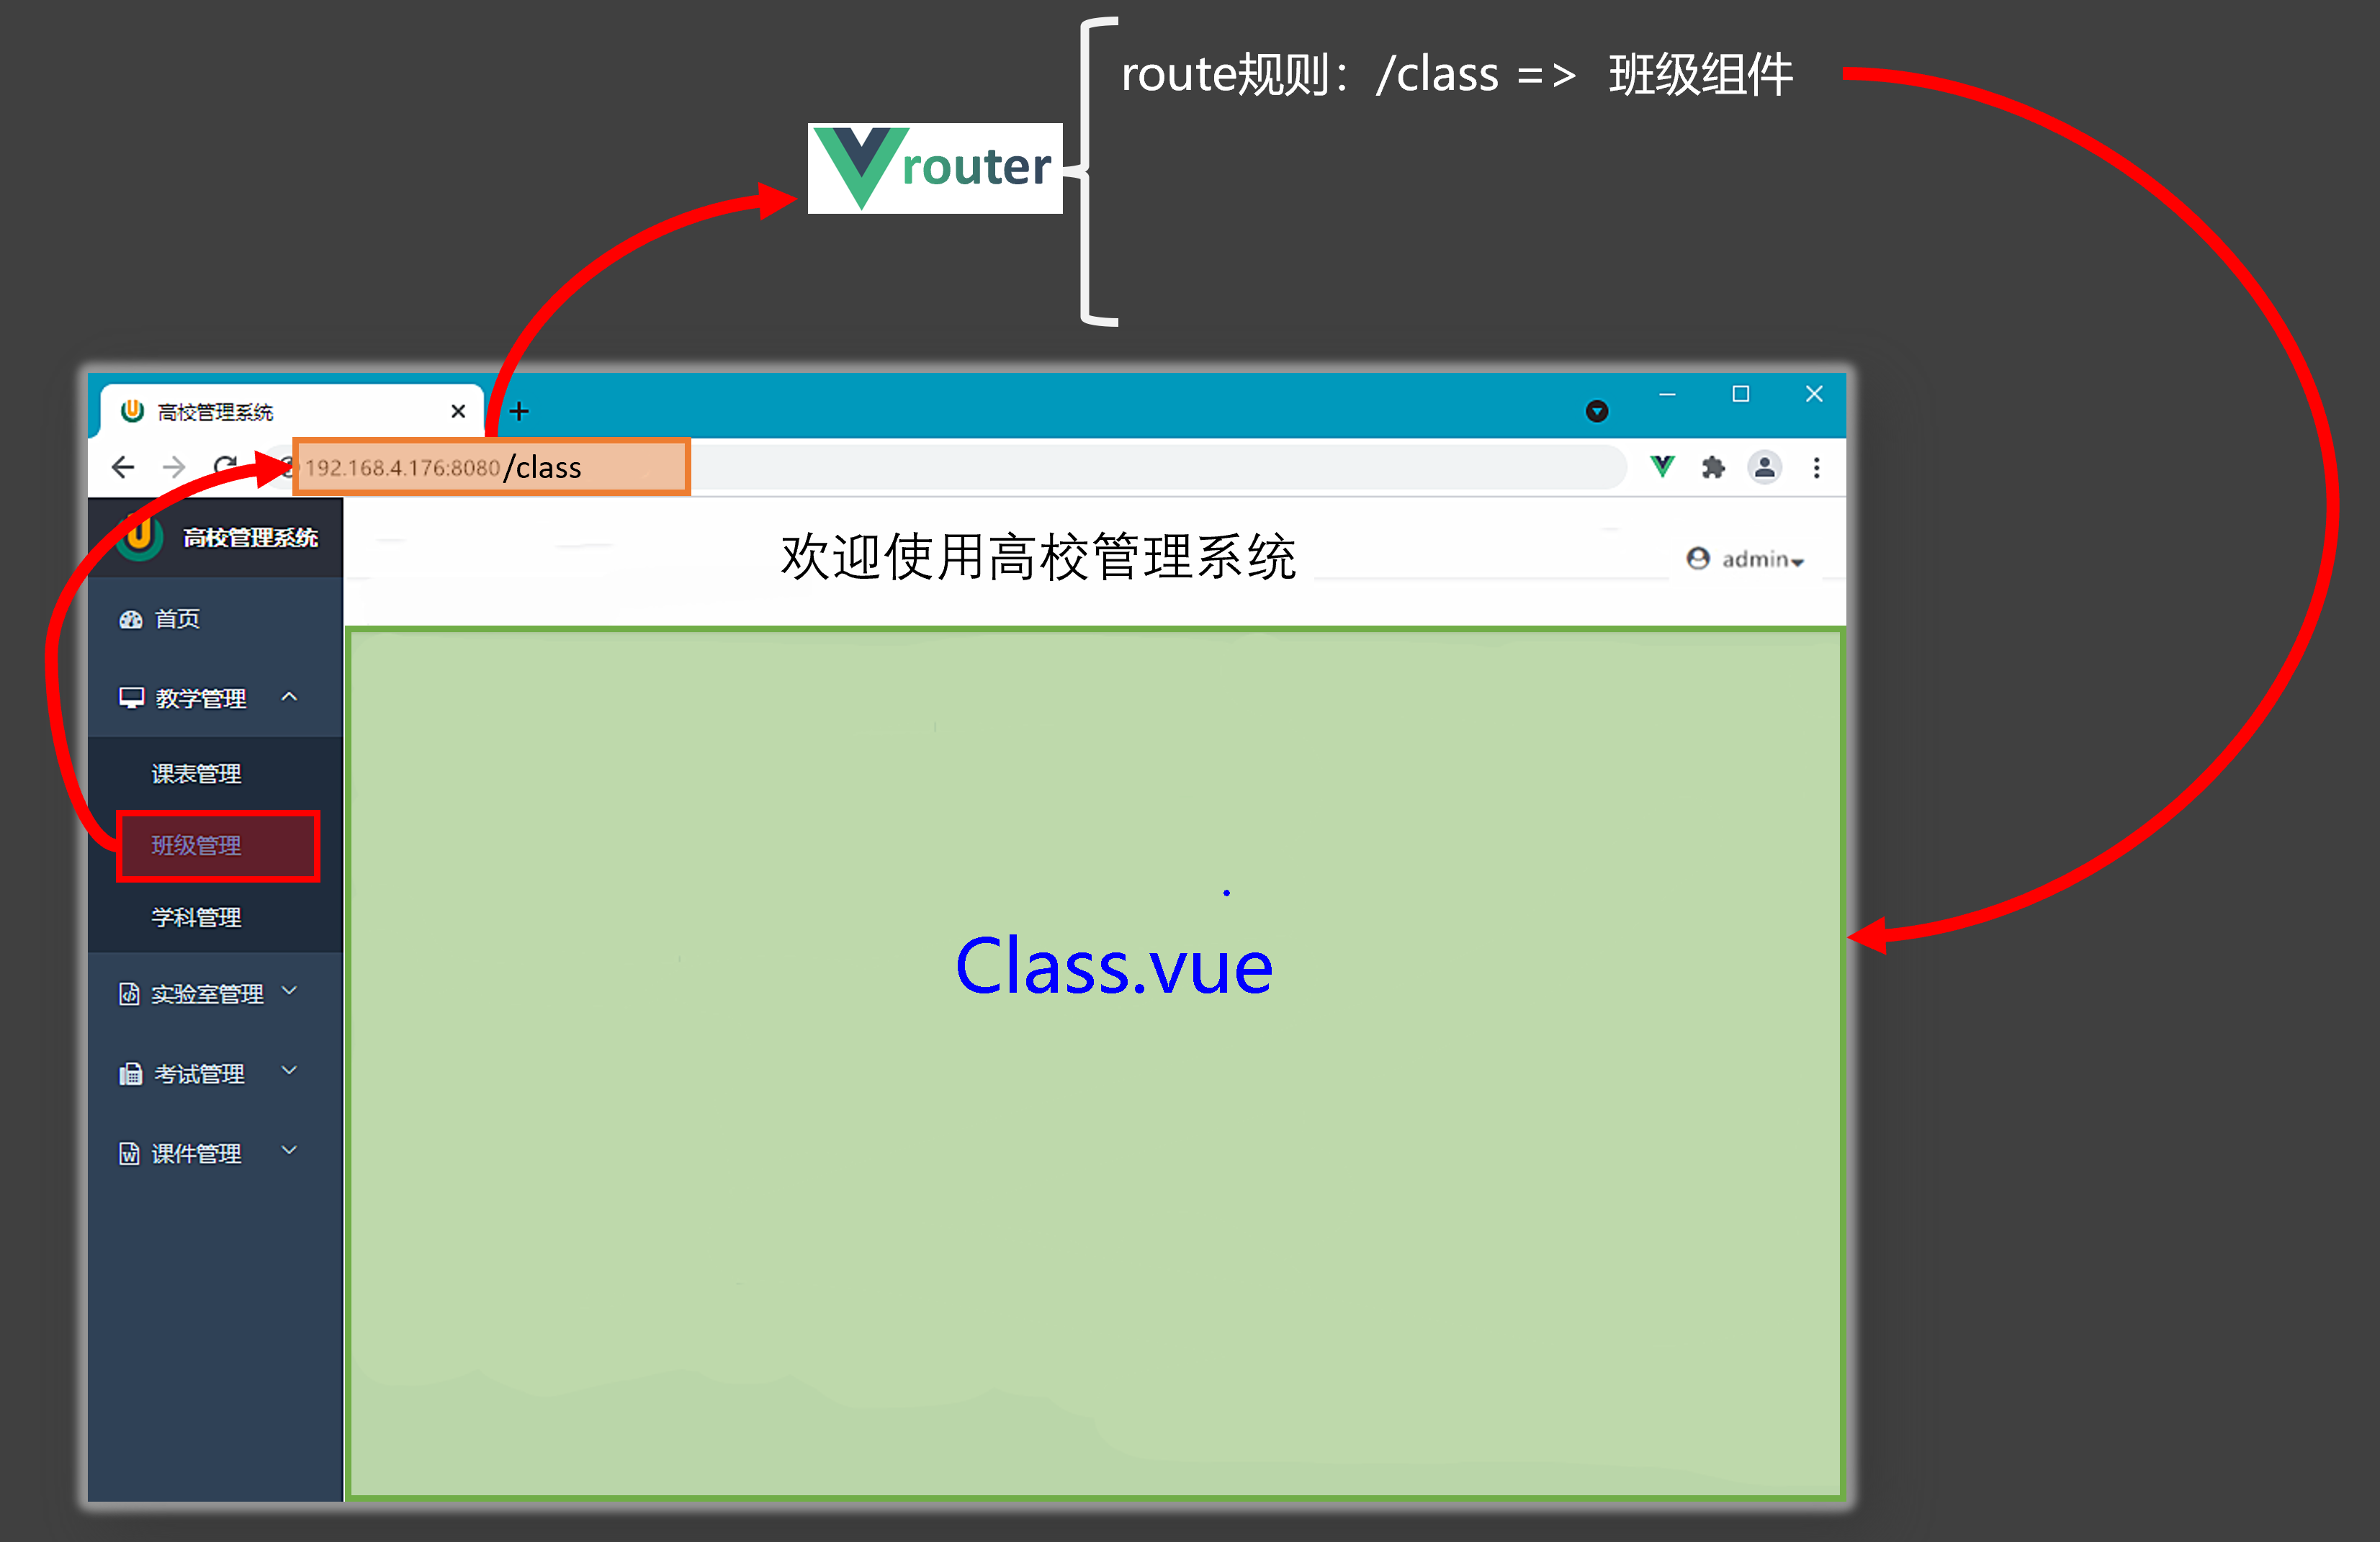
SPA(single page web application)单页 Web 应用
2、基本切换效果
-
Vue3中要使用vue-router的最新版本,目前是4版本npm i vue-router -
路由配置文件
index.ts代码如下:// 第一步:引入 createRouter import {createRouter,createWebHistory} from 'vue-router' // 引入可能呈现的组件 import Home from '@/components/Home.vue' import News from '@/components/News.vue' import About from '@/components/About.vue' // 第二步:创建路由 const router = createRouter({ history:createWebHistory(), // 路由器工作模式 routes:[ // 路由规则 { path:'/home', component:Home }, { path:'/news', component:News }, { path:'/about', component:About } ] }) export default router
-
main.ts代码如下:// 引入 createApp 用于创建应用 import { createApp } from "vue"; // 引入 App 根组件 import App from './App.vue' // 引入路由器 import router from './router/index' // 创建应用实例并挂载到 index.html 中 id 为 app 的元素上 // createApp(App).mount('#app') // 创建应用 const app = createApp(App) // 使用路由器 app.use(router) // 挂载整个应用到 app 容器中 app.mount('#app')
-
App.vue代码如下<template> <div class="app"> <h2 class="title">Vue路由测试</h2> <!-- 导航区 --> <div class="navigate"> <RouterLink to="/home" active-class="active">首页</RouterLink> <RouterLink to="/news" active-class="active">新闻</RouterLink> <RouterLink to="/about" active-class="active">关于</RouterLink> </div> <!-- 展示区 --> <div class="main-content"> <RouterView></RouterView> </div> </div> </template> <script lang="ts" setup name="App"> import {RouterLink,RouterView} from 'vue-router' </script>
3、组件的两个注意点
- 路由组件通常存放在
pages或views文件夹,一般组件通常存放在components文件夹 - 通过点击导航,视觉效果上“消失” 了的路由组件,默认是被卸载掉的,需要的时候再去挂载
4、路由器工作模式
-
history模式优点:
URL更加美观,不带有#,更接近传统的网站URL缺点:后期项目上线,需要服务端配合处理路径问题,否则刷新会有
404错误const router = createRouter({ history:createWebHistory(), // history 模式 }) -
hash模式优点:兼容性更好,因为不需要服务器端处理路径
缺点:
URL带有#不太美观,且在SEO优化方面相对较差const router = createRouter({ history:createWebHashHistory(), // hash 模式 })
5、to 的两种写法
<!-- 第一种:to 的字符串写法 -->
<router-link active-class="active" to="/home">主页</router-link>

<!-- 第二种:to 的对象写法 -->
<!-- 1:名字跳转 -->
<router-link active-class="active" :to="{name:'zhuye'}">Home</router-link>
<!-- 1:path 跳转 -->
<router-link active-class="active" :to="{path:'/home'}">Home</router-link>
6、命名路由
作用:可以简化路由跳转及传参
给路由规则命名:
routes:[
  {
    name:'zhuye',
    path:'/home',
    component:Home
  },
  {
    name:'xinwen',
    path:'/news',
    component:News,
  },
  {
    name:'guanyu',
    path:'/about',
    component:About
  }
]
跳转路由:
<!--简化前:需要写完整的路径(to 的字符串写法) -->
<router-link to="/news/detail">跳转</router-link>

<!--简化后:直接通过名字跳转(to 的对象写法配合 name 属性) -->
<router-link :to="{name:'guanyu'}">跳转</router-link>
7、嵌套路由
-
编写
News的子路由:Detail.vue -
配置路由规则,使用
children配置项:const router = createRouter({ history:createWebHistory(), routes:[ { name:'zhuye', path:'/home', component:Home }, { name:'xinwen', path:'/news', component:News, children:[ { name:'xiang', path:'detail', component:Detail } ] }, { name:'guanyu', path:'/about', component:About } ] }) export default router -
跳转路由(记得要加完整路径):
<router-link to="/news/detail">xxxx</router-link> <!-- 或 --> <router-link :to="{path:'/news/detail'}">xxxx</router-link> -
记得去
Home组件中预留一个<router-view><template> <div class="news"> <nav class="news-list"> <RouterLink v-for="news in newsList" :key="news.id" :to="{path:'/news/detail'}"> {{news.name}} </RouterLink> </nav> <div class="news-detail"> <RouterView/> </div> </div> </template>
8、路由传参
(1)query 参数
-
传递参数
<!-- 跳转并携带 query 参数(to 的字符串写法) --> <router-link to="/news/detail?a=1&b=2&content=欢迎你"> 跳转 </router-link> <!-- 跳转并携带 query 参数(to 的对象写法) --> <RouterLink :to="{ //name:'xiang', // 用 name 也可以跳转 path:'/news/detail', query:{ id:news.id, title:news.title, content:news.content } }" > {{news.title}} </RouterLink> -
接收参数:
import {useRoute} from 'vue-router'
const route = useRoute()
// 打印 query 参数
console.log(route.query)
(2)params 参数
-
传递参数
<!-- 跳转并携带 params 参数(to 的字符串写法) --> <RouterLink :to="`/news/detail/${news.id}/${news.title}/${news.content}`"> {{news.title}} </RouterLink> <!-- 跳转并携带 params 参数(to 的对象写法) --> <RouterLink :to="{ name:'xiang', // 用 name 跳转 params:{ id:news.id, title:news.title, content:news.content } }" > {{news.title}} </RouterLink> -
路由:
const router = createRouter({ history:createWebHistory(), routes:[ { name:'xinwen', path:'/news', component:News, children:[ { name:'xiang', path:'detail/:id/:title/:content', component:Detail } ] } ] }) export default router -
接收参数:
import {useRoute} from 'vue-router'
const route = useRoute()
// 打印 params 参数
console.log(route.params)
传递
params参数时,若使用to的对象写法,必须使用name配置项,不能用path传递
params参数时,需要提前在规则中占位
9、路由的 props 配置
作用:让路由组件更方便的收到参数(可以将路由参数作为 props 传给组件)
-
路由:
const router = createRouter({ history:createWebHistory(), routes:[ { name:'xinwen', path:'/news', component:News, children:[ { name:'xiang', path:'detail/:id/:title/:content', component:Detail, // props 的对象写法 // 作用:把对象中的每一组 key-value 作为 props 传给 Detail 组件 // props: {a:1,b:2,c:3} // props 的布尔值写法 // 作用:把收到了每一组 params 参数,作为 props 传给 Detail 组件 // props:true // props 的函数写法 // 作用:把返回的对象中每一组 key-value 作为 props 传给 Detail 组件 props(route){ return route.query } ] } ] }) export default router -
传递参数:
<ul class="news-list"> <li>编号:{{ id }}</li> <li>标题:{{ title }}</li> <li>内容:{{ content }}</li> </ul> -
接收参数:
defineProps(['id', 'title', 'content'])